Building a Serverless Web Application on AWS
With AWS Amplify, Cognito, DynamoDB & Lambda
As a associate system administrator I worked on Redhat Linux servers, including user management, permissions, services, and performance monitoring Automated routine administrative tasks using Bash scripting and cron jobs, reducing manual effort by ~30% I am aws certified sysops administrator and Google Certified Cloud Engineer. Determined to transition my career into cloud architect /Cloud Support role
📌 Introduction
Modern applications demand scalability, security, and zero server maintenance. In this hands-on project, we’ll build Wild Rydes — a fully serverless web application that allows users to request unicorn rides from a fictional fleet.
This project showcases how to design a cloud-native application using fully managed AWS services. No EC2 instances. No patching. No infrastructure headaches.
By the end, you’ll have deployed a production-ready, secure, scalable serverless application on AWS.
🏗 Architecture Overview

4
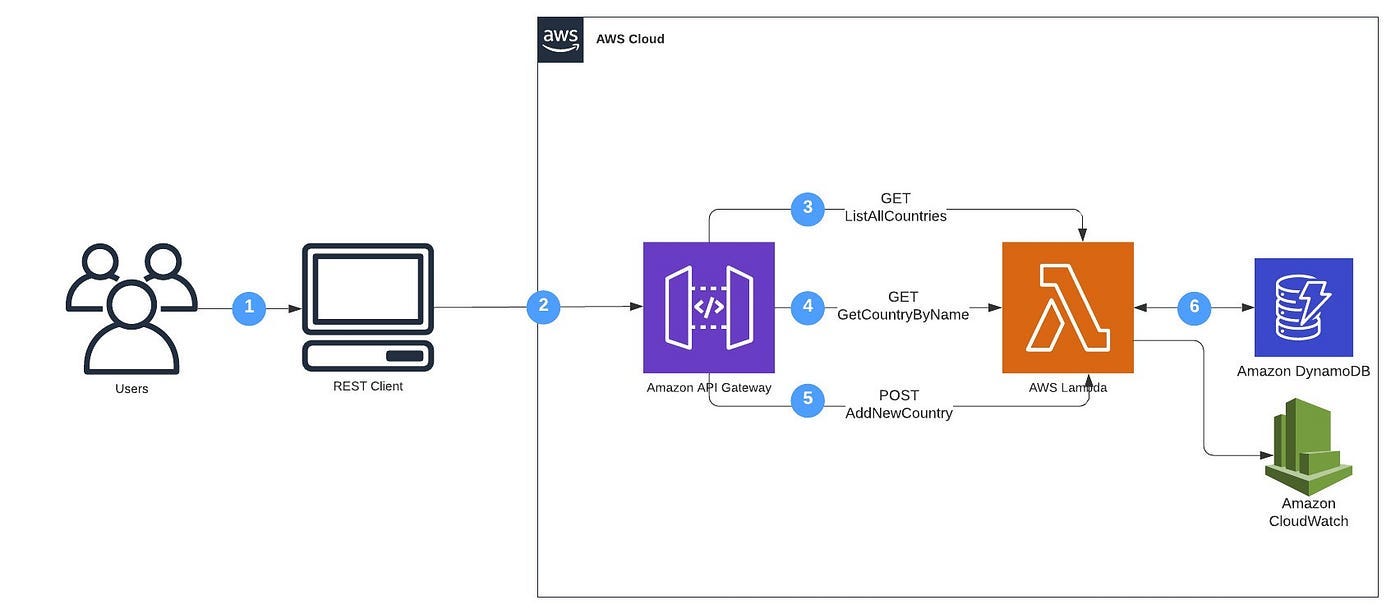
The Wild Rydes application follows a fully serverless architecture pattern:
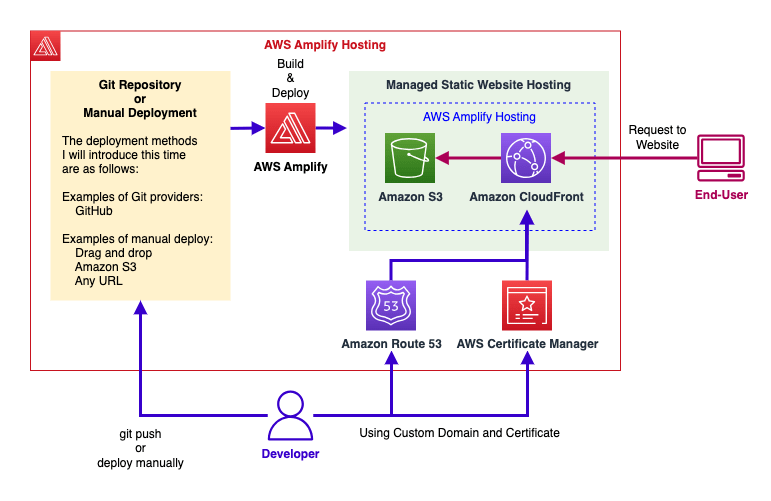
🔹 AWS Amplify
Hosts static web assets (HTML, CSS, JavaScript, images) with built-in CI/CD.
🔹 Amazon Cognito
Manages user authentication and authorization using secure JWT tokens.
🔹 Amazon API Gateway
Exposes REST endpoints for the frontend.
🔹 AWS Lambda
Executes backend business logic without provisioning servers.
🔹 Amazon DynamoDB
Stores ride request data in a highly scalable NoSQL table.
🔹 ArcGIS
Provides interactive map functionality.
Application Flow:
Browser → API Gateway → Lambda → DynamoDB
Authentication handled by Cognito
Static assets served via Amplify
🔧 Prerequisites
Before starting, ensure you have:
An AWS account
An ArcGIS account
Git installed
VS Code or any text editor
Basic understanding of:
Lambda
API Gateway
DynamoDB
Cognito
Amplify
🚀 Step 1: Host the Website with AWS Amplify
1️⃣ Create a Git Repository
You can use GitHub or CodeCommit:
git clone https://github.com/your-username/wildrydes-site
cd wildrydes-site
Copy static assets:
aws s3 cp s3://wildrydes-us-east-1/WebApplication/1_StaticWebHosting/website ./ --recursive
Commit and push:
git add .
git commit -m "Initial commit"
git push origin main
2️⃣ Enable Hosting in Amplify
Go to Amplify Console
Choose Host Web App
Connect your Git repository
Deploy
Amplify automatically:
Builds the project
Hosts static content
Provides HTTPS
Enables CI/CD on every push
🔐 Step 2: Configure Authentication with Cognito
Create a User Pool
Go to Cognito → Create User Pool
Select username-based authentication
Configure password policies
Create App Client
Note the:
User Pool ID
App Client ID
Region
Update config.js:
window._config = {
  cognito: {
    userPoolId: 'us-east-1_xxxxx',
    userPoolClientId: 'xxxxxxxxxxxx',
    region: 'us-east-1'
  },
  api: {
    invokeUrl: ''
  }
};
Push updates to redeploy.
Users can now:
Register
Verify email
Sign in
Receive JWT tokens
⚙️ Step 3: Backend with Lambda + DynamoDB
Create DynamoDB Table
Table Name:
RidesPartition Key:
RideId(String)
Create IAM Role for Lambda
Attach:
AWSLambdaBasicExecutionRoleInline policy allowing
dynamodb:PutItem
Create Lambda Function
Runtime: Node.js
Function Name: RequestUnicorn
const { DynamoDBClient, PutItemCommand } = require('@aws-sdk/client-dynamodb');
const { marshall } = require('@aws-sdk/util-dynamodb');

const client = new DynamoDBClient({ region: 'us-east-1' });

exports.handler = async (event) => {
    const rideId = Date.now().toString();

    const params = {
        TableName: 'Rides',
        Item: marshall({
            RideId: rideId,
            User: event.requestContext.authorizer.claims.sub,
            RequestTime: new Date().toISOString()
        })
    };

    await client.send(new PutItemCommand(params));

    return {
        statusCode: 201,
        headers: {
            "Access-Control-Allow-Origin": "*"
        },
        body: JSON.stringify({
            message: "Unicorn dispatched!",
            RideId: rideId
        })
    };
};
Deploy and test the function.
🌐 Step 4: Create REST API with API Gateway
Create REST API
Add
/rideresourceAdd POST method
Enable Lambda Proxy Integration
Attach Cognito Authorizer
Deploy to
prodstage
Copy the Invoke URL.
Update config.js:
api: {
   invokeUrl: 'https://abc123.execute-api.us-east-1.amazonaws.com/prod'
}
Push changes to trigger Amplify deployment.
🗺 Step 5: ArcGIS Map Integration
Add to ride.html:
<script src="https://js.arcgis.com/4.6/"></script>
<link rel="stylesheet" href="https://js.arcgis.com/4.6/esri/css/main.css">
Now:
Sign in
Open
/ride.htmlSelect map location
Click Request Unicorn
🦄 Unicorn successfully dispatched!
🧹Cleanup Resources
To avoid unwanted charges:
Delete Amplify App
Delete Cognito User Pool
Delete Lambda Function
Delete DynamoDB Table
Delete API Gateway API
Remove CloudWatch Logs
🎯 What You’ve Built
You’ve successfully implemented a production-grade serverless application using:
Amplify for hosting
Cognito for authentication
API Gateway for REST APIs
Lambda for compute
DynamoDB for storage
Key Benefits Achieved:
✅ Zero server management
✅ Automatic scaling
✅ Secure JWT-based authentication
✅ Event-driven backend
✅ Built-in CI/CD
📢 Conclusion
Serverless architecture represents a major shift in cloud application design. Instead of managing infrastructure, you focus purely on business logic.
With AWS managed services working together seamlessly, Wild Rydes demonstrates how to build:
Secure applications
Scalable systems
Cost-efficient architectures
Production-ready cloud solutions
This project is a perfect foundation for anyone learning AWS Serverless or preparing for cloud architect roles.
If you enjoyed this guide, follow for more practical cloud and DevOps tutorials. 🚀